1 The PrepIFS User Interface - Introduction
PrepIFS is an interactive meteorological application to prepare research experiments using the integrated forecasting system (IFS) at ECMWF. Both researchers at ECMWF and scientists in institutions anywhere in Europe (subject to prior permission) can access the complex computer environment at ECMWF via the Java application prepIFS or via the INTERNET using the Java-Applet PrepIFS and any standard WWW-browser. Forecast-/Analysis-Experiments can be prepared and submitted remotely. The necessary tasks, involving the preparation of initial data, the compilation/incorporation of optionally provided modifications to the original setup, the actual forecast and analysis steps and subsequent postprocessing of the produced data is done on the current supercomputer at ECMWF. The IFS is a collection of Fortran90 source code to run a global data assimilation and forecasts in various configurations. Data produced by the experiments is stored in the meteorological archive and retrieval system (MARS). Supplementary data is stored in the data handling system (DHS). Using PrepIFS there is the possibility to modify or add to the source code in order to design the experiments. There is also the possibility to access the ksh (kornshell)-scripts that are used to provide a convenient setup for the particular experiment. ClearCase - a comprehensive software configuration management system- from Atria Software, is used to manage these sources. Furthermore, PrepIFS provides a debug environment for the researcher that allows a variety of options to modify the setup and the IFS usage on a variety of executing hosts.
In particular PrepIFS enables the research scientist to prepare
- data assimilations
- forecasts
- singular vector computations
- ensemble predictions
- seasonal forecasts
- ocean(-atmosphere) coupled model experiments
- coupled wave model forecasts
- sensitivity studies
- wave model only
- ...
2 The PrepIFS User Interface - The communication/server setup
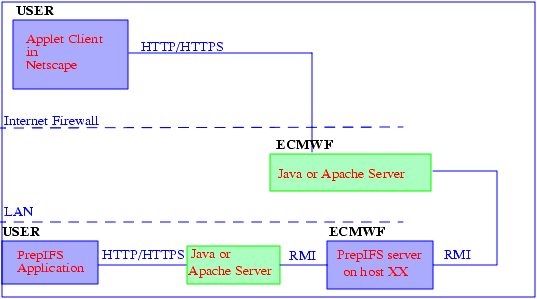
ECMWF webservices are hosted by Java or Apache Servers. They normally work as information providers serving documents to WWW browser clients. ECMWF's webservers communicate via the HTTP or secure via the HTTPS protocol which has the advantage of being able to pass through firewall software protecting the ECMWF environment against fraud. PrepIFS is a client/server application either running the User Interface as an application using the local implementation of Java or using a Java enabled WWW browser such as Netscape as the client to visualize the User Interface. Communication is by means of HTTP or HTTPS and invokes actions on Java Objects located on remote servers (Java's remote method invocation (RMI)) for delivering data or computations. The time required to perform these are dependent on the status of the network such as available bandwidth and other users activities. Figure 2.1 gives a schematic overview of the communications involved.
Figure 2.1 Overview of the communications involved between the WWW browser running the user applet and the actual task running at ECMWF in the local area network (LAN) by remote method invocation (RMI). Note, that if PrepIFS is used as an application it is also using a server for delivering data or computations.
3 The PrepIFS User Interface - Connection to SMS (Supervisor Monitor Scheduler)
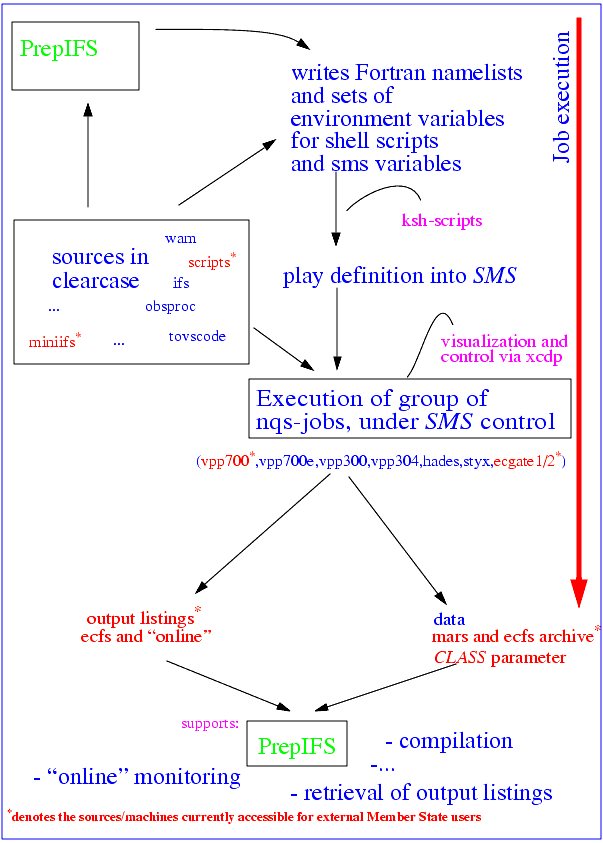
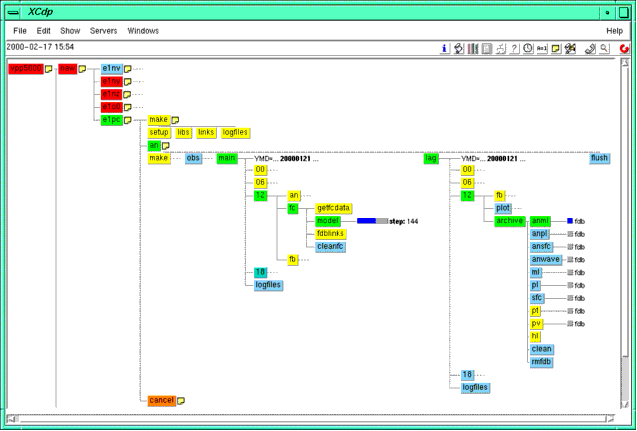
When an experiment is prepared it involves various processes to setup a suitable working environment for a set of tasks. In an environment such as ECMWF tasks should make an optimal use of the system. This involves parallelism on the level of executing several tasks at the same time as well as tasks that contain parallel execution models themselves (e.g. IFS forecast). Therefore, PrepIFS makes use of the supervisor monitor scheduler (SMS). Users talk to SMS using either the command and display program (CDP), or its X-windows equivalent (XCdp). CDP takes command line input and has some full screen capabilities; XCdp is an X-Windows/Motif based program. However, it is planned to provide a WWW interface to these vital control tools. SMS is a server controlling the flow of an experiment during its time in the supercomputer. It schedules the various tasks and it provides via XCdp a tool to modify the flow interactively. It is PrepIFS that defines the "flow" and provides the necessary setup which currently consists of a set of Fortran namelists, a set of environment variables for ksh-scripts to control the behaviour of the tasks, a set of SMS-definitions, a ClearCase interface and access to scripts and Fortran/C source code. The "variables" defined by PrepIFS are included in each task depending on the machine the task is executed on. SMS macro processing automatically converts the "task-containers" into ordinary nqs (network queuing system) jobs before submission. The final execution of each task is controlled via nqs on the executing host. Figure 3.1 gives a schematic overview of the activities of PrepIFS. Figure 3.2 provides a snapshot of a typical experiment (set of tasks) submitted by PrepIFS and controlled by SMS. The picture is taken from the current XCdp display. PrepIFS enables the user to choose the SMS server to which the experiment should be submitted to. There will be a SMS server provided separately for each Member State to ensure the integrity of the experiments. Scientists at ECMWF may choose which server they want to use by simply providing the name in the user interface. Some of these servers will be monitored by the operators. "Private" servers which are more suitable for debugging or less time critical work can be launched on the user's workstation on request. This service is not available for member state users.
Figure 3.1 Schematic overview of PrepIFS activities
Figure 3.2 XCdp display of a current PrepIFS experiment (set of tasks) running a data assimilation with a forecast extended to 240 hours (currently at hour 144).
4 The PrepIFS User Interface - Overview
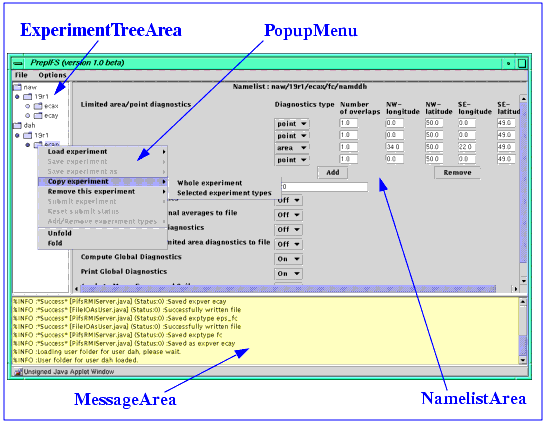
The user interface shown in Figure 4.1 is split into three main areas. The ExperimentTreeArea displays the hierarchy of an experiment starting with the owner, the IFS version number (cycle) and the experiment identifier (which is also used in the data storage system mars to retrieve the data later on). An "experiment tree" is further split up into different types (e.g. forecast, data assimilation, ocean model...) and into different containers called namelists which contain the variables that can be set and modified for each particular experiment setup. A typical example of the postprocessing namelist is shown in Figure 4.2. It is important to note, that a namelist may refer to a Fortran namelist, a set of sms-variables, a set of ksh-variables or a mixture of all three types.
Figure 4.1 The PrepIFS - user interface is split into three main areas: the display area for the namelists, the display area for the IFS version number (cycle), the experiments and owners of the experiments and the display area for information and/or warning messages.
Figure 4.2 An example of the display of a typical namelist in PrepIFS. The ExperimentTreeArea shows a collection of namelists for the chosen experiment. The NamelistArea displays the variables and values to be set in form of option menus, buttons, text fields and labels. Descriptive hints and explanations are displayed if the focus of the mouse points to a particular label. Hyper links if available are provided to more extensive information (e.g. IFS Fortran code realisation, scientific documents describing specific options, etc.) by clicking on the descriptive label.
5 The PrepIFS User Interface - Navigation
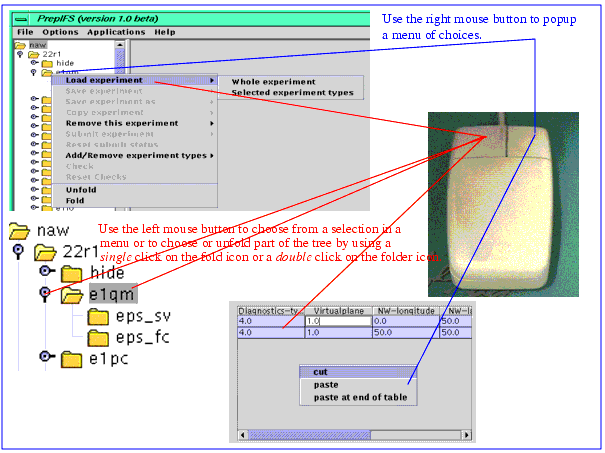
The User Interface is driven by mouse events as explained in Figure 5.1.
Figure 5.1 Use and function of the mouse buttons. There are different popup menus while using the right mouse button depending on the position of the mouse pointer on the tree or on the item that currently holds the mouse focus. E.g. tables which are visualization of arrays of any kind use the popup menu on the right mouse button to operate (cut and paste) on the selected rows. The above example shows two rows which have been selected by holding the left mouse button and dragging it along the rows. Note, that the first row cannot be removed.
6 The PrepIFS User Interface - The top menu bar
The File menu in the top menu bar of the User Interface controls which user is displayed. It is possible to add or remove other users from this area. The permission to read the experiments of another user are controlled via the normal unix file permission. Users are added by just typing the user's identifier into the query popup window.
The Options menu modifies the behaviour and the look of the User Interface. The Message Level reduces/increases the amount of information displayed in the MessageArea. The User Level enables the user to override decisions made by the User Interface during consistency checks. There are currently three levels: Novice (default)/Advanced/ Expert. Note, that changes imposed by the checks will be executed in novice mode but only suggested in advanced and expert mode. The Display Level enables the user to shorten download times and display times. In mode short the information displayed in the NamelistArea will only contain the variable name but no further explanations. The other options are only influencing the look of the interface, e.g. colours, size, resize behaviour etc. The settings in the options menu can be saved to a file which is read on start-up.
The Applications menu starts related applications. Currently, there is a only a link provided to the experiment meta database which is written for each experiment and each user on submission.
The Help menu provides a link to the online documentation of PrepIFS and related IFS documentation.
7 The PrepIFS User Interface - The ExperimentTreeArea
The ExperimentTreeArea is used to display a collection of experiment identifiers of a user. The experiments are grouped by owner, cycle (which is the particular release of the IFS used), experiment name (typically a 4 character string) and the types. Types are short-cuts for the various configurations, e.g. an == analysis (+forecast), fc == forecast only, eps_fc == EPS ensemble, eps_sv == EPS singular vector computation, sens == sensitivity setup, oc == ocean (+atmosphere coupled) model, wam == wave model only etc. The ExperimentTreeArea is a visualization of the user's File Folder $HOME/prepifs/saves (on the server at ECMWF). Therefore, only experiments/directories actually saved in this path and provided with the correct unix file permission can be seen by the User Interface. If prepIFS is started for the first time the path name will be created when the experiment is saved, created or submitted. After loading an experiment the tree displays a set of bullets which provide links to the NamelistArea. A single click with the left mouse button will display the corresponding namelist. A namelist is a collection of variables and arrays which are displayed in a variety of text fields, tables, choice menus and toggle buttons which the user can change. The namelist nodes which are considered to be more important to look at are highlighted in a different colour.
The following section illustrates the options that are available as popup menus on a typical user's tree.
Figure 7.1 Popup menu in the user folder, creating a new cycle
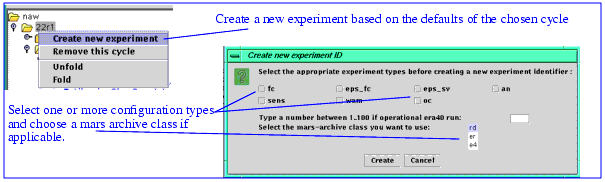
Figure 7.2 Popup menu in the cycle folder, creating a new experiment
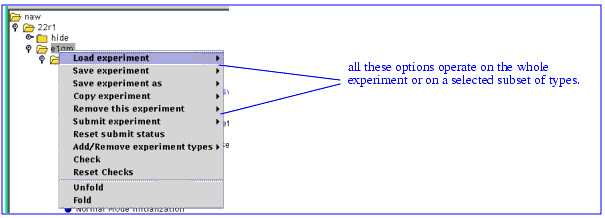
Figure 7.3 Popup menu in the experiment folder
Load experiment... requests the defaults for the chosen cycle from the server and if applicable adds the settings that have been saved in a previous session for this experiment.
Save experiment... executes an incremental save of the differences to the default setup into the user's default location ($HOME/prepifs/saves).
Save experiment as... copies the experiment to a new (or existing) experiment identifier. This option does not load the experiment and one has to explicitly request the loading of the new identifier.
Copy experiment... copies the experiment to a new (or existing) experiment identifier. This option loads the new experiment at the same time. Note, that this option should be used to clone experiments of another user by copying it into the user's own tree.
Remove experiment... removes the experiment from the tree and attempts to remove it from mars/ecfs and any other possible references (e.g. meta database). Initially the setup is only moved to a waste basket ($SCRATCH). However, there is no backup for data removed from mars or ecfs.
Submit experiment... submits the experiment to the chosen host. This option will automatically save and check the data before submission and will prompt the user whether to continue or not.
Reset submit status... resets the selection of various types to none if a subset has been selected for submission.
Add/Remove experiment types... adds or removes the selected experiment types to/from the tree. The configuration types are not loaded automatically. They can be loaded by selecting the load option or alternatively by clicking the left mouse button on a selected type.
Check... executes a consistency check of the contents of all namelists. It displays a summary of this check in a separate window, highlighting the changes (in novice mode) or suggestions (in advanced mode) and displaying a summary page of the experiment. This summary corresponds to the information which would be saved in the experiment's meta database. The check aborts if there is an inconsistency found which cannot be resolved (see the section below for further details).
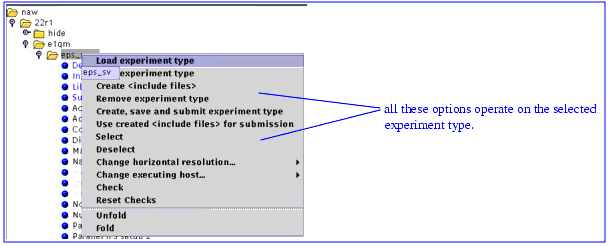
Figure 7.4 Popup menu in the experiment type folder
Load experiment type requests the defaults for the chosen cycle from the server and if applicable adds the settings that have been saved in a previous session for this experiment type.
Save experiment type executes an incremental save of the differences to the default setup into the user's default location ($HOME/prepifs/saves).
Create <include files> creates some of the files which are to be used in the sms-containers and the suite/family definition in the default location ($HOME/prepifs/saves/...). This option is useful if the original files are edited before submission. Use this option together with Check and Use created <include files> for submission.
Create, save and submit experiment type submits the experiment type to the chosen host. This option will automatically save and check the data before submission and will prompt the user whether to continue or not.
Remove experiment type removes the experiment type from the tree and attempts to remove it from mars/ecfs and any other possible references (e.g. meta database). Initially the setup is only moved to a waste basket ($SCRATCH). However, there is no backup for data removed from mars or ecfs.
Use created <include files> for submission submits the experiment type to the chosen host. This option will prompt the user whether to continue or not. However, any changes imposed by the check at this stage do not have any effect because the submission process will use the files previously created by Create <include files>. This option is useful if you want to edit the original files ($HOME/prepifs/saves/...) before submission. It should be preceded by a call to Check and a call to Create <includes>.
Change horizontal resolution... changes the horizontal resolution to the selected set. This is done at the experiment type level because a change of resolution effects several subsequent namelists. The effect is shown in the message area where every resulting change is listed. It is recommended to use this option before changing the namelists themselves to avoid conflicts.
Change executing host... changes the execution host to the selected set. This is done at the experiment type level because a change of the execution host effects several subsequent namelists. The effect is shown in the message area where every resulting change is listed. It is recommended to use this option before changing the namelists themselves to avoid conflicts.
Check executes a consistency check of the contents of all namelists. It displays a summary of this check in a separate window, highlighting the changes (in novice mode) or suggestions (in advanced mode) and displaying a summary page of the experiment. This summary corresponds to the information which would be saved in the experiment's meta database. The check aborts if there is an inconsistency found which cannot be resolved (see the section below for further details).
Reset check resets the check (currently not necessary).
Select selects the current type (e.g. for submission).
Deselect deselects the current type (e.g. for submission).
8 The PrepIFS User Interface - The NamelistArea
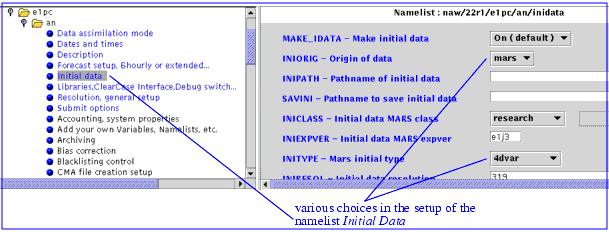
The NamelistArea displays the selected namelist. A namelist is a collection of variables and arrays which are displayed in a variety of text fields, tables, choice menus and toggle buttons which the user can change. A typical example is the Initial Data namelist as shown in Figure 8.1.
Figure 8.1 Example of a namelist displayed in the NamelistArea
The label on each item can be clicked with the left mouse button to display further information on this item in the default web-browser. If there is no further information available it will show the not found page. Some of the text fields have checks for the expected contents e.g. numbers, strings, dates etc. If there is a format error of the input detected the text field will be red. If there is a check on the text field this can be forced by pressing <enter>. On pressing the right mouse button on a text field there is a popup menu displayed which enables the user to reset the contents to the default, to a previous value or to the previously saved value (if applicable). There is also the option to temporarily disable the writing of the corresponding item. This option can be used to remove items out of a namelist for an experiment without creating and editing the original <include files>. In choice menus the default value is explicitly marked. Some of the fields appear in a read only status which is the case if you are viewing a tree of another user or for specific items like the resolution or the executing host which are changed as a popup menu item in the ExperimentTreeArea.
9 The PrepIFS User Interface - Check and Summary
The consistency check has been introduced to overcome the maintenance problem of a growing set of special rules which were introduced inside the source code over the time in order to ease the handling of initial data, configurations that do not work, special setups etc. Therefore, a macro language has been invented with which the administrator of PrepIFS can easily add new rules. These rules are of the form
// Define operational MARS data
// Before operational IFS, use ERA-15 instead
(inidata@MAKE_IDATA=="true")&&(inidata@INICLASS=="od")&&
(ecmwf.pifs.checkPrepIFS.CheckUtils.compareDates(inidata@INITIME[0],$DATE_IFS) < 0)? (inidata@INICLASS="er");
The check evaluates these rules and sets in above case inidata@INICLASS to "er". There is a possibility to override this behaviour if this check would not be appropriate for whatever reason. The user can change to an advanced mode where such changes are only suggested but not executed. Note, that there are also a few variables where the setting is enforced. There is in principle no limitation to the form or number of rules other than efficiency. Information needed during the checks that can only be acquired by the server has to be prefetched or requires a network transfer of this information which could be slow.
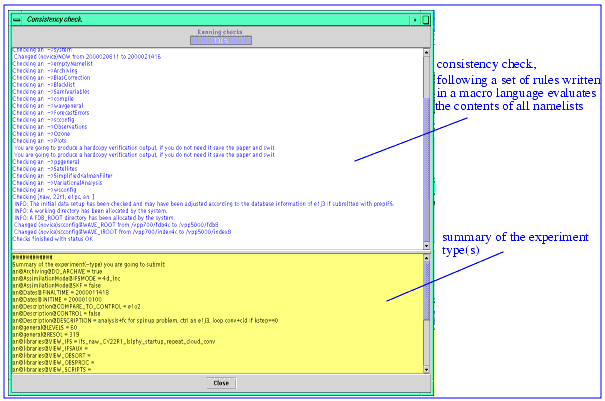
Figure 9.1 Consistency check window
The summary of all experiments belonging to a particular user can be viewed using a standard web browser. The corresponding link can be found in the top menu bar item Applications (or just bookmark it in your browser once selected).
10 The PrepIFS User Interface - How to...Getting started
You can start the application by simply typing
prepIFS &
in your desktop window. The applet version will soon be available via a standard www-browser. However, in order to access it you will require a certificate issued by the web server at ECMWF.
11 The PrepIFS User Interface - How to...Example how to submit/extend an analysis (an)
1) You create a new cycle (only if it does not exist yet).
2.1) You create a new experiment under this cycle (choosing the type an in the popup window that appears) or alternatively you use an existing experiment and load it by clicking with the left mouse button on the type an or by using the right mouse button and selecting Load experiment or Load experiment type from the popup menu.
2.2) Alternatively, you load an experiment of another user (by displaying his tree and loading the wanted experiment). Then you clone this experiment by copying it into your own tree using Copy experiment from the popup menu.
3.1) If you extend an existing analysis you only change the Dates and times namelist adjusting the first and the last cycle so that the first cycle starts $PERIOD hours later than the previous last cycle.
3.2) If you begin a new analysis you should check at least the highlighted namelists and enter the necessary input. Note, that the data assimilation and forecast should be combined in one suite by extending the forecast in the Forecast setup to the required length (e.g. 240 hours).
4) Check in Submit options to which SMS you are submitting your job.
5) If you don't want to submit right now just save your settings by selecting the Save experiment or Save experiment type option from the pull down menu.
6) If you want to submit (you can still change your mind after selecting this option) you select Submit experiment or Create, save and submit experiment type.
7) If you find inconsistencies or unwanted settings in the check window or in the summary page you should press the <cancel> button and make the necessary changes before submitting. If you are happy with your changes or changes made by prepIFS during the check press the <continue with submit> button. You will receive a string of messages in the MessageArea confirming the successful submission or an error window will appear.
8) Finally check in Xcdp whether your experiment arrived (click on the update button in the top right corner of the Xcdp display). If you cannot see it, check which SMS you sent it to and if you are displaying this SMS in your current Xcdp display (choose the right server from the list of Servers in the top menu bar of Xcdp).
12 The PrepIFS User Interface - How to... Adding modifications to the source code of IFS and incorporate them into an experiment
PrepIFS provides the possibility to use updates from a versioned object database (VOB) of ClearCase. Clearcase is a commercial version control tool. In the ECMWF setup the system identifies "your" modifications via a view name which contains a set of rules defining which part of the database you want to "look" at and via the branch name. A branch of a file is typically a (sub-)version of the latest default of the original file labelled with a name containing the user identifier, the IFS cycle (release on which the version is based) and any name given by the user (e.g. the whole branch name would be: naw_CY22R1_mybranch). You can have one or more modified files in one view which would all be labelled with the same branch name. There are a range of scripts and a GUI - tool available to assist you in creating views and branches. For details how to modify files in the source (e.g. checkout a file, modify the file and check the file in again etc.) and how ClearCase works in the ECMWF setup please check the ECMWF ClearCase user guide for details. To get started you would typically use the following sequence in a terminal window if you want to modify the source for the project ifs based on the IFS cycle (release) CY22R1:
selbranch -p ifs -b mybranch -r CY22R1
you will be in a new shell with a (sub-)directory structure like
elphin{/cc/rd/ifs}116 %ls
adiab climate interface obs_preproc phys_ec transform
ald_inc common kalman obsolete pointer utility
bin control lost+found ocean pp_obs var
c9xx dfi module parallel setup wave
canari dia namelist parameter sinvect
canari_common function nmi phys_dmn support
where each subdirectory contains one file for each subroutine. You can modify subroutine phys_ec/callpar.F90 using
chedit phys_ec/callpar.F90
which will create the branch, checkout the file, open an editor (using the environment variables WINEDITOR or EDITOR) and checkin the file after editing and closing the editor.
This modification or modifications to any of the other projects in ClearCase (see ClearCase guide for more details) can now be identified by a single string: the view name. In prepIFS you enter the page Libraries, ClearCase Interface,... and you enter the view name of your modifications into the corresponding textfield (there is one textfield for each project). You can select if you want to use only modifications up to the current time (default) or if you do not want any time stamp added into the configuration file which is used to select and compile your modifications. The second option is recommended for debugging (select USEDATE_... off). The actual process of finding your modifications, compiling them and merging them into the default set of libraries is done via the tasks libs and links in the make family of your experiment setup (See "The PrepIFS User Interface - How to... XCdp: A quick guide") once it is submitted (See "The PrepIFS User Interface - How to...Example how to submit/extend an analysis (an)").
13 The PrepIFS User Interface - How to... Running on a server, debugging with Totalview, incorporating ClearCase updates
PrepIFS provides the possibility to use updates from a versioned object database (VOB) of ClearCase and to debug these with Totalview. Totalview is a commercial GUI based debug tool which is easy to handle. The middle mouse button in the main window frame of Totalview shows a popup menu with various choices how to proceed. Using the left mouse button the user can dive into subroutines, display the value of variables and arrays by clicking on the name or set breakpoints by clicking on the relevant line number. Further details are provided by the Totalview online help which can be selected in the main popup menu.
You can select to run a low resolution (typically T63 or T21) analysis or forecast on a multi-processor server (e.g. hades or styx. Note, that the option is currently not available for member states). This option is useful for debugging or if you are interested in the qualitative behaviour of the IFS model. In particular this can be combined with the ddh diagnostics package to investigate various aspects of the numerics or the physical parameterizations. The data can be archived in mars and there is a preliminary fdb available. Note, that the option to run on a multi-processor server is currently not available for member states. However, a similar job can be submitted to the supercomputer except for the option to use totalview.
1) You create and load or copy a new experiment (see previous section for details).
2) If you have modifications to any of the projects in ClearCase (see ClearCase guide for details) you enter the page Libraries, ClearCase Interface,... and you enter the view name of your modifications into the corresponding textfield. You can select if you want to use only modifications up to the current time (default) or if you do not want any time stamp added into the configuration file which is used to select and compile your modifications. The second option is recommended for debugging (select USEDATE_... off).
3) If you want to produce ddh diagnostics you should select these by selecting a point or area in the namelist Limited area diagnostics... and by switching the relevant logical variable to on. The ddh data is saved in a file which is automatically transferred to the DHS system after the successful completion of the IFS forecast. Currently, the file has to be retrieved and worked on with a separate package.
4) If you want to debug with totalview you should enter the name of the host/screen you want to use to display totalview. Enter the namelist Compiler options, debugging and change the variable DISPLAY accordingly.
5) Choose your initial data in the namelist Initial data,... Note, that interpolations from a high resolution are currently not possible due to a lack of memory. Therefore, it is recommended to prepare a set of initial data in a lower resolution by running a short forecast on one of the super computers and save the initial data into ecfs. Alternatively, to get started there is a dataset available if you choose the following initial data:
(INICLASS = rd, INITYPE = an, INIEXPVER = e0qz, INITIME/INIBEGINDATE/FIRSTCYCLE = 1999063006/12/18, 1999070100/06/12/18. INILEVELS=31, INIRESOL=21).
6) Select the execution host (styx or hades) with the popup menu Change execution host... in the ExperimentTreeArea.
7) Choose a low resolution (21server or 63server) with the popup menu Change horizontal resolution... in the ExperimentTreeArea.
8) Select your own SMS for submission. In the namelist Submit options choose for SMS_NAME provide your own and type your user name or the workstation name into the text field next to it.
9) Submit the experiment (see previous section for details).
10) If you want to use Totalview modify the variable DEBUG in XCdp in the variables window of the task libs and set it to the project name (e.g. ifs) which you want to debug. Make sure you do this before the task is submitted (e.g. suspend the suite just before submitting the experiment). For details how to use XCdp (See "The PrepIFS User Interface - How to... XCdp: A quick guide").
11) If you want to use Totalview modify the variable DEBUG in XCdp in the variables window of the task where the executable is called which you want to debug (e.g. model task). Set the variable DEBUG to the name of that executable (e.g. ifsMASTER). For details how to use XCdp (See "The PrepIFS User Interface - How to... XCdp: A quick guide").
14 The PrepIFS User Interface - How to...Advanced rd users only: modify the submit process and the sms - definition of an experiment
In the Submit options namelist there is the possibility to enter the name of an alternative submit script (e.g. you type in the text field public/setup_sms.$USER). This script has to be put into the following path name:
/home/rd/rdx/bin/prepifs/public
by copying the default script into this place e.g.
cp /home/rd/rdx/bin/prepifs/setup_sms
/home/rd/rdx/bin/prepifs/public/setup_sms.$USER
and modifying it to your needs. As can be seen from the script the submit process is divided into two stages. Part one prepares the scripts setup and extracts the necessary bits from ClearCase. Part two creates the sms-definition file from existing templates and plays the sms definition into SMS which can then be visualized using XCdp. Depending on which part should be modified you can use the existing scripts and sms templates as default, copy them e.g. to your home directory and call them from your modified master script with a reference to $HOME. Note, that a setup created like this can serve as a default experiment and other users may directly benefit from such setup by just copying this experiment into their own tree under a new name inheriting the new setup. This way a flexible parallel development of new features can be enabled without interference. Note, that you can also define new variables or namelist entries in prepIFS which are automatically saved with your experiment setup and therefore inherited if passed on to other users without tedious editing of files. This way you can even define new include files(See "The PrepIFS User Interface - Frequently asked questions" for details).
15 The PrepIFS User Interface - How to... XCdp: A quick guide
This section explains briefly how to use and how not to use XCdp. This quick guide is by no means complete but should give some guidance to beginners. XCdp is a powerful tool which should be used with care.
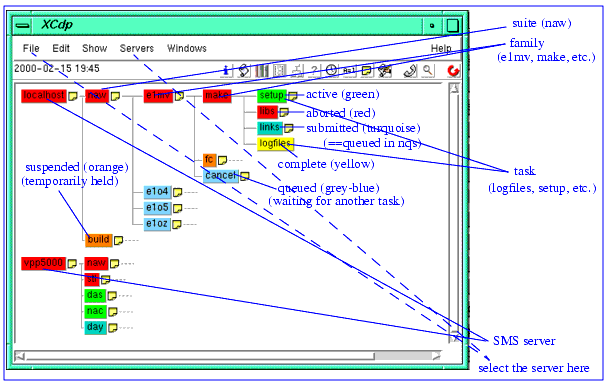
XCdp displays in this context one or more experiment trees as can be seen in Figure 15.1. The leaf of a tree contains the actual (nqs-)job which is executed. When a job turns from its status queued into submitted it goes through a preprocessing stage evaluating all variables of the form %xxx% and converting a task.sms into a task.job. Then this created job is submitted using the variable %SMSCMD%.
Figure 15.1 Xcdp display of the localhost server and the vpp5000 server. The different colours symbolize the status of the task or family (active, aborted, submitted, complete, suspended, queued). Leaves in a tree are called tasks and contain the actual (nqs-)jobs of the experiment.
In order to start XCdp just type
xcdp &
In the top menu bar there is a list called Servers with which you can choose the SMS server you want to view. You should only view the servers you are really interested in. In order to reduce the overall system time to constantly update your display of the chosen server you should also reduce the number of visible suites in a selected server. Navigation is similar to prepIFS (See "The PrepIFS User Interface - Navigation") as there is a popup menu available on each of the selected nodes of the visible tree. If you want to reduce the number of visible suites you should select the node with the SMS server name and pressing the right mouse button select Suites from the popup menu. With the left mouse button you can select the suites you want to monitor and then press the apply button in the top right corner of the popup window.
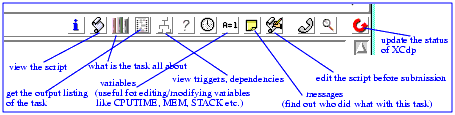
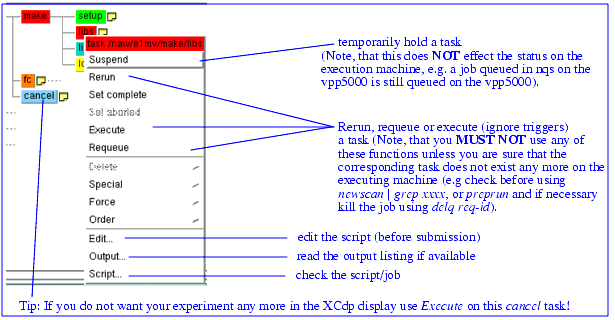
Figure 15.3 illustrates the available options on a task and its limitations for the user. Alternatively, you can select a task or family in the experiment tree with the left mouse button and use the tool bar shown in Figure 15.2.
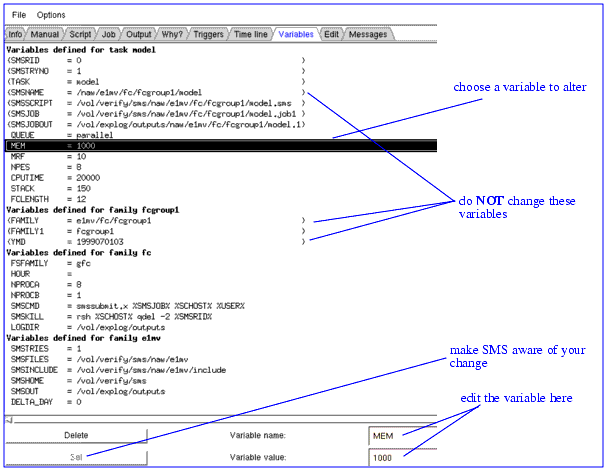
The variables page of XCdp shown in Figure 15.4 can be useful to adjust predefined limits of a task (e.g. memory, stack size, number of processors, etc.). If you choose the variables page you can select with the left mouse button the variable you want to alter from the main page which is then also displayed in the bottom right. Now the user can change the variable value and press the set button which alters the variable. XCdp/SMS will keep the altered variable value until the experiment disappears from XCdp. If it can be avoided the user should not alter system variables (e.g. all variables enclosed in brackets ()) because this may have serious side effects on the overall functionality of the experiment family.
Figure 15.2 The toolbar in XCdp. Note, that the tools are operating on the node in the displayed tree that has been previously selected with the left mouse button.
Figure 15.3 The available popup menu options on a task in XCdp. This is a typical situation where the libs task which compiles user supplied modifications failed and should be rerun (keeping the previous output) or requeued e.g. after changing the source code of the relevant library in ClearCase (See "The PrepIFS User Interface - How to... Running on a server, debugging with Totalview, incorporating ClearCase updates", section 2)).
Figure 15.4 Variables display in XCdp.
16 The PrepIFS User Interface - Frequently asked questions
Press the right mouse button on the cycle folder on the tree in the ExperimentTreeArea and select Create new experiment.
Use a single mouse click on the fold icon or a double mouse click on the folder. Alternatively, press the right mouse button and use the popup menu item Fold or Unfold.
Press the right mouse button with the mouse pointer on the tree structure (node or leaf) that you are interested in.
Load the other experiment using the option Load experiment or Load experiment type in the corresponding popup menu. If it belongs to another user, you have to display the tree of the other user first using the top menu bar item File and Add user. Then select Copy experiment from the popup menu and choose a destination.
- How do I define a script variable or SMS-variable or namelist item that does not exist anywhere or is not editable?
Select the namelist Add your own variables... and edit the table EMPTY. Format specifies the output format you want the variable or name to appear as in the output file specified under Filename. Currently, you can choose between SMSFormat, FortranFormat and ShellFormat. If you want to place the new entry in one of the existing file names which are used by the default setup script you can choose ifsnam for a Fortran namelist entry (currently only used in the model task for the types fc and eps_fc and eps_sv). For Shell script variables to be included in every task of your experiment you should use the file name config.h. For SMS-variables (not editable) which are to be used inside the SMS-definition file you should use the file name sms_def. The namelist name determines for Fortran namelists where to place the entry. For shell scripts it could be relevant if you wanted to put the new entry at a particular place in the file config.h. In the text fields Variable and Value you should type variable and value as you want them to appear as they are treated as plain strings.
Select Submit experiment or Create, save and submit experiment type in the corresponding popup menu.
The check performs a consistency check of the user input and links various namelists and variables together resolving any existing dependencies. If there are problems the check aborts. A window is displayed summarizing the checks and displaying any possible conflicts.
You can change the User level in the top menu bar Options to advanced mode. However, currently it is recommended to run a check in novice mode before changing to advanced mode to let the interface resolve most of the simple dependencies.
Check the mars browser for your experiment (currently http://w3ec/mars/user/index.html). Alternatively, just try and retrieve something using metview.
The log files of the tasks are saved in the DHS. You can check for the variable FSROOT in your experiment setup. Currently, FSROOT is set to /RDX/prepIFS (for member states /x$GROUP/public, e.g. GROUP=it). You can check/retrieve the data or log files belonging to your experiment (e.g. xxxx, rd user, date 1999101512) using something like the following sequence:
els ec:/RDX/prepIFS/xxxx/log
and e.g. retrieve the log files for the make family by
ecp ec:/RDX/prepIFS/xxxx/log/make/make.1999101512.tar.Z $SCRATCH
uncompress $SCRATCH/make.1999101512.tar.Z
tar -xvf $SCRATCH/make.1999101512.tar
Then you can view the particular task output you are interested in.
The experiment setup including all the scripts, sms containers and includes is copied into one directory structure. The name can be found in the variables window on any node of the relevant experiment by searching for SMSFILES which is the path name for most of the sms containers unless they are in a subdirectory structure similar to the one displayed in XCdp. SMSINCLUDE gives you the path name of all the includes which are used inside the sms containers (e.g. config.${type}.h contains most of the environment variables for the relevant type e.g. an, setup.h contains derived environment variables and ifsnam.${type}.h contains a Fortran namelist). You can find out which include is used by checking the script of the task in XCdp (sometimes includes contain themselves include files, though). If tasks are still in a queued state you can modify the corresponding task or any includes it uses. Once the job is in submitted state SMS has preprocessed the task and sent it to the executing host. At this stage you can neither edit the task nor deal with this task any more via XCdp. You have to use tools like newscan or qstat or tailored scripts like preprun to find the job on the execution machine (SCHOST/WSHOST in the variables window indicates where that is). Note, that you MUST NOT requeue a task that has been already submitted unless you are sure it is not any more queued in nqs on the executing host. You can delete an unwanted task using the command delq <request-id>.
- Why is the setup of an analysis (an) or a sensitivity (sens) experiment different from a forecast (fc) or EPS (eps_fc, eps_sv) and what is the difference?
In principle there is no difference between these experiment types. However, The data assimilation system and the sensitivity is more complex than a single series of forecasts. Therefore, currently the Fortran namelist input for the various tasks in an an or sens experiment type is inside the scripts. Modifications will therefore only take effect if the relevant scripts are changed. The other experiment types allow the setup of the whole namelist (as their is only one for each of these types) to be created by prepIFS. The namelist is created as an include file (ifsnam.$t{ype}.h) which is copied into SMSINCLUDE. This allows more flexibility to the user as he does not have to provide a Clearcase scripts branch for simple additions to the controlling namelist and he can create and view the complete namelist before submission (See "The PrepIFS User Interface - The ExperimentTreeArea" for details how to create the <include files>).
17 The PrepIFS User Interface - Known Bugs & Features
1) The JTable implementation of Java is bugged in jdk1.1.6 and the procedure of cut and paste seems cumbersome. Sometimes one cannot type a character or number. This can be overcome by moving the mouse pointer outside the frame of the application and back. The paste function removes the row before. Use paste at end of table instead.
2) Sometimes thread conflicts appear which usually are resolved by just retrying the same action.
3) The mouse listener + clipboard for cut and paste is not registered on all error windows.
If you want to submit a bug report please email naw@ecmwf.int or dah@ecmwf.int.
| Quadralay Corporation http://www.quadralay.com Voice: (512) 719-3399 Fax: (512) 719-3606 support@quadralay.com sales@quadralay.com |